To repair cracks in concrete driveways, you need to understand that a concrete driveway crack is a split or fissure in the surface caused by stress, weather, or settling. In New Jersey, where freeze-thaw cycles and heavy rainfall are common, cracks appear in driveways, creating both aesthetic issues and potential safety hazards. These cracks widen when left untreated, allowing water infiltration that damages the underlying base and compromises the driveway's structural integrity.
Repairing concrete driveway cracks involves a systematic approach. Start by assessing the type and severity of the cracks, as hairline cracks only need minor filler, while larger or deeper cracks require more extensive repair. Clean the cracks thoroughly to remove dirt, debris, or loose concrete using a wire brush or compressed air. Next, apply a suitable concrete filler or patching compound, ensuring it penetrates the crack completely. Finally, smooth the surface and allow it to cure, restoring the driveway's durability and appearance. Proper maintenance and timely repairs prevent further damage and extend the life of concrete driveways.
Why Does Concrete Crack in Driveways?
Concrete cracks in driveways are due to a combination of natural settling, environmental factors, and installation issues. Shrinkage during curing, soil movement, and freeze-thaw cycles all lead to fissures in the surface. Heavy traffic, poor drainage, and inadequate reinforcement or low-quality concrete further increase the risk of cracking. Recognizing these causes is vital for timely repairs and preventative measures, helping maintain the driveway's durability, safety, and curb appeal over time.
What Materials Do You Need to Repair Cracks in a Concrete Driveway?
The materials you need to repair cracks in a concrete driveway are application tools to restore both the functionality and appearance of your driveway. They are vital for ensuring a durable and long-lasting repair.**** Having all the necessary materials on hand makes the repair process smoother and more efficient, especially for commercial or high-traffic areas.
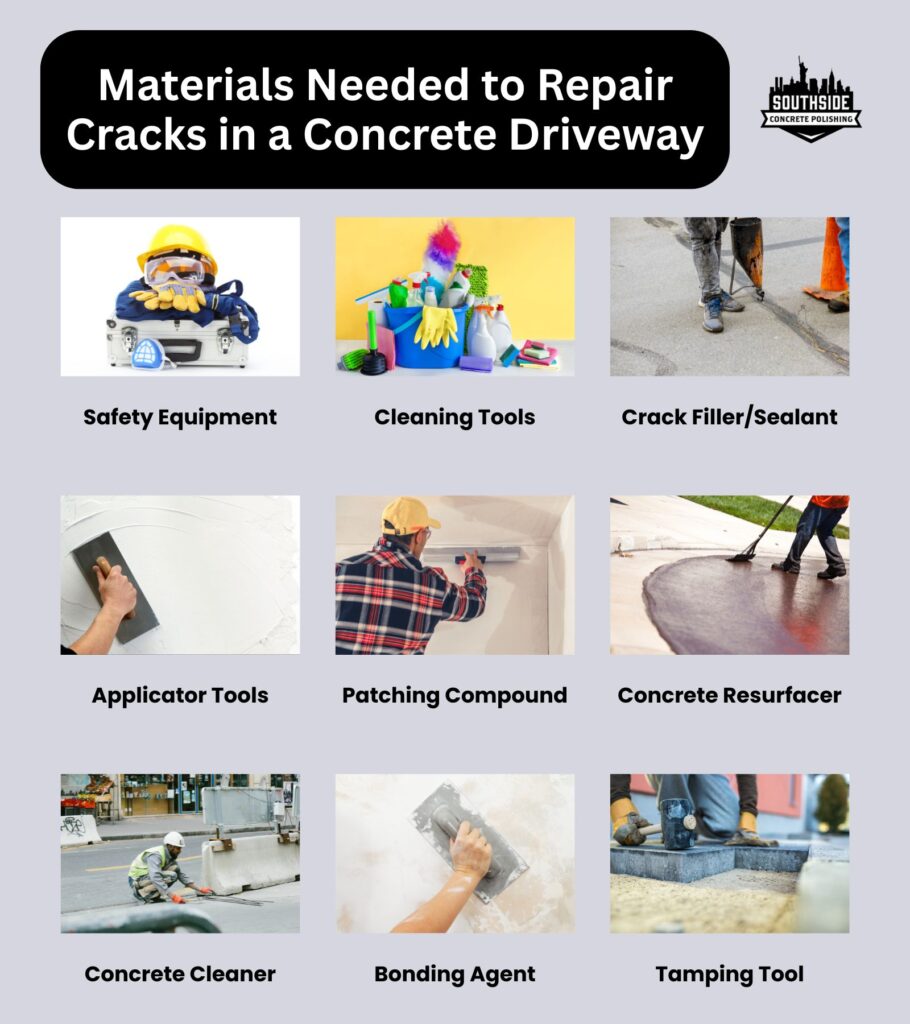
Here are the important materials required for repairing concrete driveway cracks:
-
Safety Equipment: Always prioritize safety by wearing protective gear, including gloves, safety goggles, and a dust mask, to prevent injuries during the repair process.
-
Cleaning Tools: Thoroughly clean the cracks using a wire brush, stiff bristle brush, or pressure washer to remove dirt, debris, and loose concrete, ensuring proper adhesion of the repair materials.
-
Crack Filler/Sealant: Choose a suitable filler or sealant such as liquid crack filler, concrete caulk, epoxy-based, or polyurethane products. Select one that matches the size and type of cracks and is compatible with concrete.
-
Applicator Tools: Depending on the filler, use a caulk gun, trowel, putty knife, or specialized applicator to evenly apply the product into the cracks.
-
Patching Compound: For larger or deeper cracks, use a patching compound available in powder or pre-mixed form, applied with a trowel or putty knife for complete filling.
-
Concrete Resurfacer: For extensive surface damage, a polymer-modified concrete resurfacer restores the entire driveway's appearance and structural integrity.
-
Concrete Cleaner: Use a concrete cleaner or degreaser to remove stains, oil, or contaminants that prevent proper bonding of repair materials.
-
Concrete Bonding Agent: For deeper or wider cracks, a bonding agent improves adhesion between the existing concrete and repair compound, enhancing durability.
-
Tamping Tool or Tamper: Use a tamper to compact and level the filler or patching compound, ensuring a solid, long-lasting repair.
What Are the Factors to Consider When Choosing the Right Repair Method?
The factors to consider when choosing the repair methods for concrete driveway cracks include the type and severity of the cracks, underlying causes, movement, aesthetic preferences, budget, and whether professional assistance is needed. Evaluating these elements ensures that the chosen repair method is both effective and long-lasting, preventing future damage and maintaining the driveway's appearance. Understanding these factors is especially important for commercial and high-traffic properties where durability and functionality are critical.
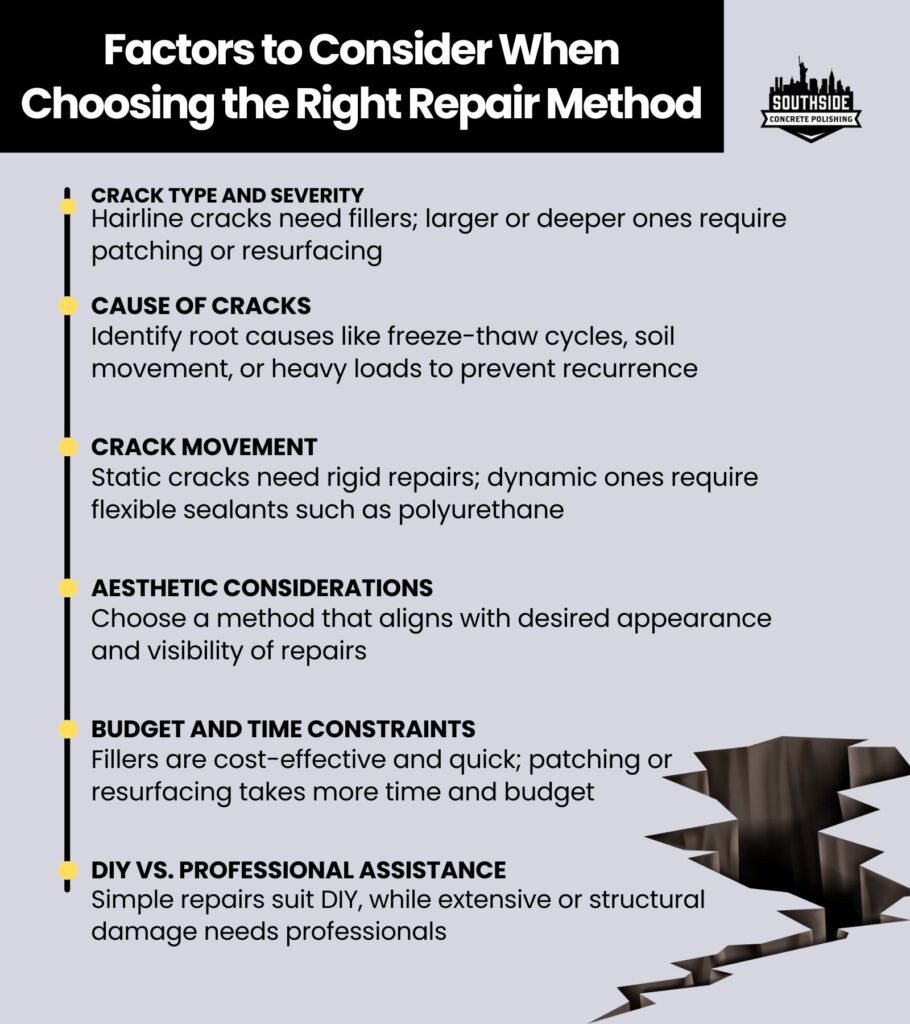
Here are the key factors to consider when selecting a repair method:
-
Crack Type and Severity: Identify whether the cracks are hairline, shrinkage, or structural. Minor cracks only need liquid fillers, while larger or deeper cracks require patching or resurfacing.
-
Cause of Cracks: Determine if the cracks result from freeze-thaw cycles, soil movement, heavy loads, or construction issues. Addressing the root cause is essential to prevent recurrence.
-
Crack Movement: Assess whether cracks are static or dynamic. Dynamic cracks that expand or contract require flexible materials like polyurethane sealants to accommodate movement.
-
Aesthetic Considerations: Consider how visible the repair will be. Crack filling or sealing blends seamlessly, whereas patching or resurfacing alters the driveway's appearance more noticeably.
-
Budget and Time Constraints: Evaluate costs and time requirements for different methods. Simple crack filling is quicker and more affordable, while patching or resurfacing involves higher costs and longer completion times.
-
DIY vs. Professional Assistance: Minor repairs are manageable for DIY projects, but complex cracks or extensive damage require professional expertise for durability and proper execution.
What are the Different Methods to Repair Cracks in Concrete Driveways?
The different methods to repair cracks in concrete driveways include a variety of techniques designed to address specific crack types, sizes, and underlying causes. Choosing the right method depends on the severity of the damage, the desired aesthetic outcome, and whether the cracks are static or dynamic. Proper selection ensures a durable, long-lasting repair that restores both functionality and appearance.
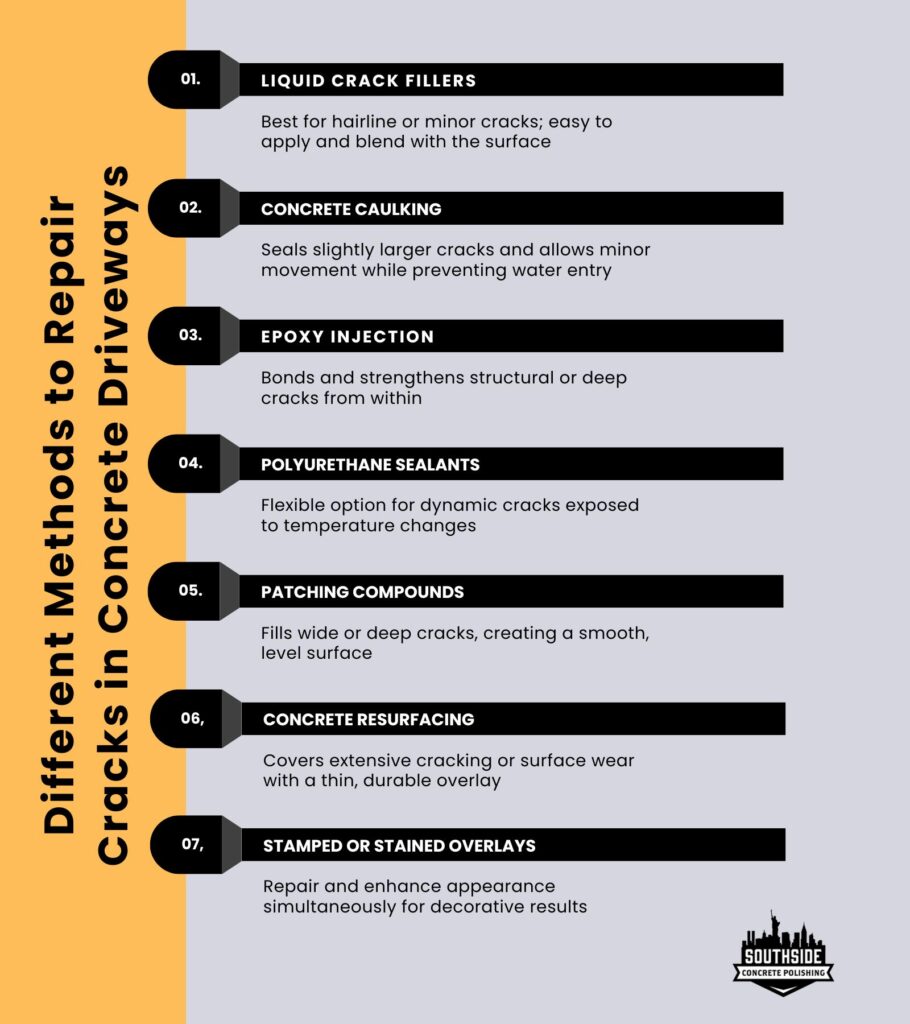
Here are the main methods for repairing concrete driveway cracks:
-
Liquid Crack Fillers: Ideal for hairline and minor cracks, these liquid fillers penetrate the crack and harden to create a seamless repair. They are easy to apply and blend well with the existing concrete surface.
-
Concrete Caulking: Used for slightly larger cracks, caulking provides a flexible seal that accommodates minor expansion and contraction while preventing water infiltration.
-
Epoxy Injection: Best for structural or deep cracks, epoxy injection bonds the concrete from within, restoring strength and preventing further deterioration.
-
Polyurethane Sealants: Suitable for dynamic cracks that expand or contract, these flexible sealants maintain adhesion without cracking, making them ideal for driveways exposed to temperature changes.
-
Patching Compounds: For wider or deeper cracks, patching compounds fill and level the damaged area, creating a smooth, uniform surface when applied with a trowel.
-
Concrete Resurfacing: For extensive cracking or surface deterioration, resurfacing involves applying a thin polymer-modified overlay across the entire driveway, restoring appearance and structural integrity.
-
Overlay with Stamped or Stained Concrete: In addition to repairs, overlays enhance aesthetics while addressing multiple cracks, providing both a functional and decorative solution for commercial properties.
How to Prepare for Repairing Cracks in a Concrete Driveway?
To prepare for repairing cracks on concrete driveways, proper surface preparation is vital to ensure a strong, long-lasting repair. A clean, stable, and well-prepared surface allows the repair materials to adhere effectively, preventing future cracking or deterioration. Taking safety precautions and addressing all surrounding conditions also contributes to a professional-quality finish.
Here are the key steps to prepare a concrete driveway for crack repair:
-
Wear Safety Gear: Prioritize safety by using gloves, safety goggles, and a dust mask to protect yourself from dust, debris, and potential hazards during preparation.
-
Clean the Surface: Remove dirt, debris, loose concrete particles, and vegetation from the cracks and surrounding area using a wire or stiff-bristle brush.
-
Remove Loose Concrete: Use a chisel, scraper, or screwdriver to clear out deteriorated concrete, creating clean edges and a stable base for the repair materials.
-
Degrease Stains: Treat oil or grease spots with a concrete cleaner or degreaser to ensure proper adhesion of the filler or patching compound.
-
Dry the Surface: Allow the cleaned area to dry completely, preventing moisture from interfering with the repair material's bonding.
-
Inspect Expansion Joints: Check nearby expansion joints for damage and repair or replace them if necessary to maintain structural integrity.
-
Protect Adjacent Areas: Use plastic sheeting or masking tape to shield landscaping, walls, or other surfaces from accidental spills or damage during repairs.
Following these steps ensures the driveway is properly prepared, setting the foundation for a durable and professional crack repair.
How to Repair Cracks in a Concrete Driveway?
To repair cracks in a concrete driveway, a systematic approach with proper tools and materials ensures a durable and professional-looking finish. Whether addressing small hairline cracks or larger structural fissures, following the correct steps helps restore both the appearance and functionality of your driveway. Safety and proper preparation are key to achieving long-lasting results.
Here is a step-by-step guide to repairing cracks in a concrete driveway:
Step 1: Prepare the Crack
Begin by thoroughly cleaning the crack and the surrounding area. Use a wire brush, stiff-bristle brush, or pressure washer to remove dirt, debris, loose concrete, and any vegetation. Ensure the crack is completely clean and dry to allow the repair material to adhere properly.
Step 2: Assess the Crack Size
Determine whether the crack is small (hairline) or large (deep/wide). This will help you choose the appropriate repair method and materials, such as liquid crack filler for minor cracks or patching compound for larger ones.
Step 3: Fill Small Cracks
For hairline or minor cracks, use a liquid crack filler or concrete caulk. Cut the tip of the tube at a 45-degree angle and apply the filler directly into the crack. Smooth it with a putty knife or trowel, so it is level with the surrounding surface.
Step 4: Repair Large Cracks
For wider or deeper cracks, mix a patching compound according to the manufacturer's instructions. Apply it with a trowel or putty knife, ensuring the crack is filled, and the surface is leveled with the surrounding concrete.
Step 5: Allow Curing
Let the repair material cure fully, usually 24--48 hours, depending on the product. Proper curing ensures the repair is strong and long-lasting.
Step 6: Apply a Concrete Sealer
Once cured, apply a concrete sealer to protect the repaired area from moisture, UV exposure, and chemicals. Use a sealer suitable for driveways and follow the manufacturer's instructions for application.
Step 7: Optional Finishing Touches
For improved aesthetics, lightly texture or polish the repaired area to match the surrounding concrete. This step is especially useful for visible commercial driveways to maintain a uniform appearance.
Step 8: Safety Precautions
Always wear safety goggles, gloves, and other protective gear during the repair process. Follow all manufacturer instructions and precautions for the products used to ensure safe and effective repairs.
How to Prevent Cracks on Your Concrete Driveway?
To prevent cracks on your concrete driveway, proper planning, installation, and ongoing maintenance are vital. While some cracking occurs naturally over time, taking proactive steps significantly reduces the risk and extends the driveway's lifespan. For commercial and residential properties alike, implementing these measures ensures a durable, visually appealing surface that withstands daily use and environmental stressors.
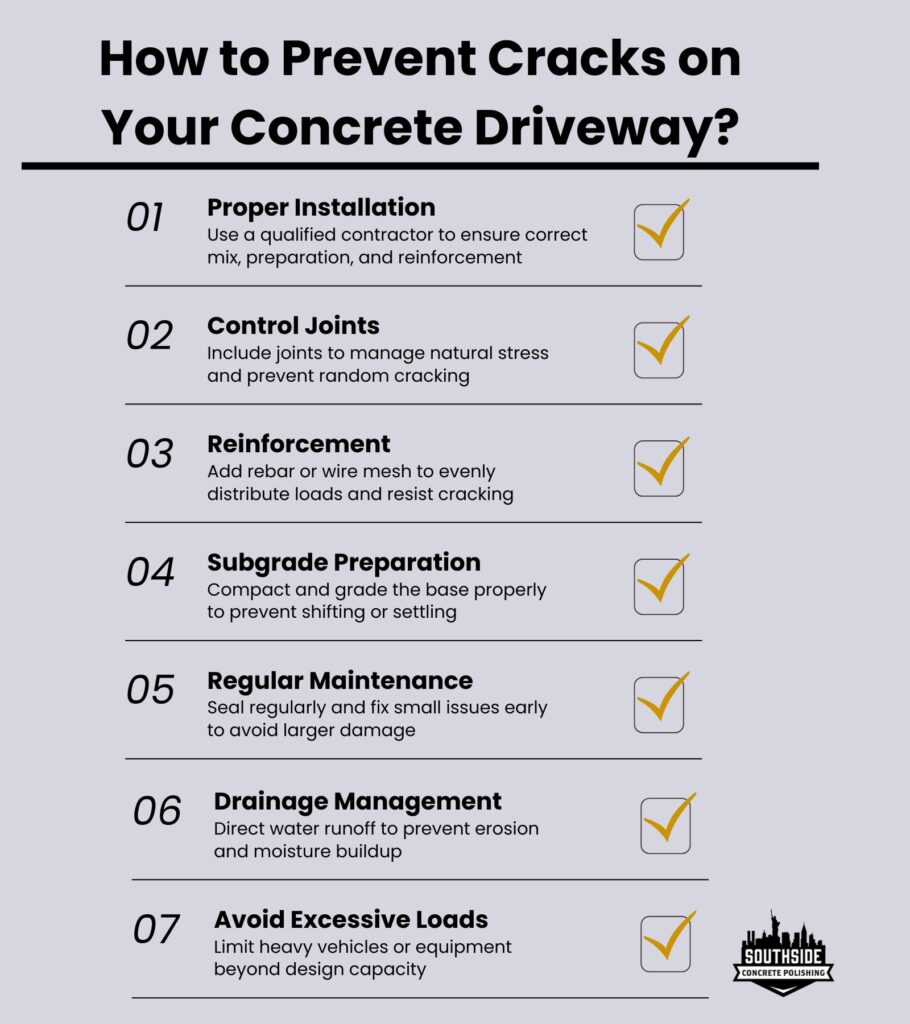
Here are key steps to help prevent cracks in your concrete driveway:
-
Proper Installation: Hire a reputable contractor who ensures correct site preparation, appropriate concrete mix, and proper reinforcement during installation.
-
Control Joints: Incorporate control joints in the design to manage stress and allow controlled cracking, preventing random fissures.
-
Reinforcement: Use steel rebar or wire mesh to distribute loads evenly, minimizing the likelihood of cracking under heavy traffic or weight.
-
Subgrade Preparation: Ensure the base is well-compacted and properly graded to prevent settlement, shifting, or water accumulation beneath the driveway.
-
Regular Maintenance: Periodically seal the surface and promptly address minor issues to protect against moisture, freeze-thaw cycles, and general deterioration.
-
Drainage Management: Direct water away from the driveway to avoid erosion or pooling that weakens the concrete over time.
-
Avoid Excessive Loads: Limit heavy vehicle or equipment traffic beyond the driveway's design capacity to reduce stress and potential cracking.
How long does a concrete crack repair last?
A concrete crack repair lasts for several years when done with proper surface preparation, high-quality materials, and effective sealing. Regular maintenance, including periodic resealing, helps preserve the repair and prevent further damage. With the right care, repaired cracks remain durable and functional for a long time.
Can repaired cracks reappear?
Yes, repaired cracks can reappear if the underlying issues, such as soil movement, poor drainage, or heavy loads, are not addressed. Dynamic cracks that expand and contract are particularly prone to recurrence. Using flexible sealants and addressing root causes helps properly seal cracks in concrete and extends the life of your driveway.
Can I apply a concrete overlay over an existing driveway?
Yes, a concrete overlay can be applied over an existing driveway to restore its appearance and repair surface damage. Proper surface preparation, including cleaning, crack repair, and sometimes a bonding agent, is vital to ensure the concrete overlays adhere well and provide a durable, long-lasting finish.
Can waterproof concrete help prevent cracks in driveways?
Yes, waterproof concrete helps prevent cracks in driveways from water penetration, which is a common cause of cracks. By keeping moisture out, waterproof concrete reduces damage from freeze-thaw cycles and extends the durability and lifespan of your driveway.